QR Ordering, Self-Service & Pickup Numbers
With DiKAS, guests can order on their own phone or at an ordering kiosk. This guide takes you from setup to handing out the order and shows how the order numbers get onto a screen of their own.
Labels in the admin area
The setup pages for self-order, QR table ordering and the table editor are labelled in German on every system. This guide therefore gives their labels in the German original, followed by a translation in brackets.
Which workflow suits your business?
| Desired workflow | Function | How the guest receives the order |
|---|---|---|
| The guest sits at the table, scans a QR code and orders on their phone | QR table ordering | The order is assigned to the table; staff bring it to the table |
| The guest orders and pays at a fixed screen on the premises | Self-order / ordering kiosk | The guest receives a pickup number and collects the finished order at the counter |
| The guest orders via your online shop for pickup or delivery | Online shop | Separate order confirmation and status page; handled via online pickup or the delivery service |
Which numbers appear on the pickup monitor?
The number display described here shows the pickup numbers of the ordering kiosk. A normal QR order at the table does not create such a pickup number. The order number of the online shop also belongs to a separate workflow. For QR tables use table self-ordering, for internet orders the online shop.
Straight to the step you need: QR at the table · Set up the ordering kiosk · Show numbers on a screen · Mark an order as ready · Troubleshooting
Before setting up
- The module Self-Service (QR-Bestellung) (self-service, QR ordering) must be part of your licence. For additional ordering kiosks the matching number must be booked; the admin area shows how many are available.
- Articles, prices, options and visibility must be maintained. Also check the assignment to the kitchen: the active section Küchenmonitor (kitchen monitor) in the print options of the article or its article group determines which items are prepared in the kitchen.
- All devices must be able to reach your DiKAS installation. For QR orders on guests' phones, the configured guest address must be reachable.
- For an ordering kiosk you need an assigned, configured card terminal. A receipt printer is optional. To work with the digital kitchen, set up the kitchen monitor.
Open Admin → Settings → Operations → Operations and, in the module list, enable the functions you need: QR table ordering and/or Self-order. Save. The tabs of the same name then appear in the Operations category. If a tab is missing, also check the Expert view mode.
QR ordering at the table
One-time preparation
- Enable QR table ordering as described above.
- Open Admin → Online-/QR-Einstellungen (online/QR settings). Maintain the articles shown and the look of your menu.
- Open Admin → Settings → Operations → QR table ordering. Decide whether orders should be confirmed automatically. Without the additional online shop module, QR orders are always accepted immediately.
- Open the table management under Service areas, choose the table group and the table you want. In the section QR-Selbstbestellung (QR self-ordering) click QR-Code erzeugen (generate QR code).
- Print the code via the printer icon. With QR drucken (print QR) in the toolbar you print the codes of the whole table group.
- Scan the printout with a guest phone and check the table, menu and prices. Lokal testen (test locally) checks the view on your own device; the additional test on the phone checks the guest link actually on display.
Keep using printed QR codes
Leave QR-Code-Tokens bei Tagesabschluss erneuern (renew QR code tokens at end of day) switched off if the same table stands are to be reused. After a renewal the old printouts no longer work and must be replaced.
A normal visit
- The guest scans their table's code, chooses articles and options and sends the order.
- With automatic confirmation the order appears directly on the table. With manual confirmation and an active online shop, staff first accept it under Table orders at the POS.
- The kitchen prepares the items intended for it. Staff bring food and drinks to the table shown.
- The guest orders more if needed. Payment is taken by staff or, with online payment set up, via Pay on the phone.
With Nur PrePay (Bestellung erst nach Online-Zahlung annehmen) (prepay only — accept the order only after online payment) the order is only accepted after confirmed online payment. Stripe must be set up for this. The complete workflow including seats, splitting the bill and calling a waiter is described in table self-ordering.
Setting up the ordering kiosk
- Enable Self-order in the module list and open Admin → Settings → Operations → Self-order.
- Under Kiosk-Login enter the user name and password of the DiKAS user intended for the kiosk. The kiosk uses these details to sign in.
- Under Automaten (kiosks) click Automat hinzufügen (add kiosk). Give it a clear name, such as "Entrance".
- Select this kiosk's EC-Terminal (card terminal) and, if needed, a Bon-Drucker (receipt printer). Each kiosk needs its own card terminal.
- Under Erlaubte Artikelgruppen (allowed article groups) select the range on offer. Without a selection all active groups are shown. Check the result at the kiosk.
- Under Verzehr (consumption) set whether guests should choose "eat in" or "takeaway". With Betrieb ohne Tische (operation without tables) this choice is dropped; guests start with Order.
- Under Küche & Ausgabe (kitchen & counter) decide whether pure food orders are already finished with the kitchen's confirmation. The consequences are explained below.
- Save. In the kiosk row copy the Adresse am Automaten (address on the kiosk) and open exactly this address in the browser of the device concerned. You can store it there as the start page or a bookmark.
Take the address from the admin area
The kiosk row provides the complete address for your installation. Do not assemble it from the shop address. In hosted installations the POS path contains, for example, /admin/selforder/1.
Removing kiosks from the list
The number in the address corresponds to the position in the kiosk list. If an earlier row is deleted, the numbers of the following rows shift. Then transfer the new addresses to the affected devices and check the assignment of card terminal and printer.
What the guest does at the kiosk
- Choose Eat in, Takeaway or Order.
- Choose articles and options, check the cart and go to payment.
- Pay at the associated card terminal.
- After successful payment note the pickup number shown, for example 142. If offered, the guest can open the digital receipt via the QR code.
- Watch the number display. As soon as 142 appears under Ready, collect the order at the counter.
The pickup number is created after payment. It is not the invoice or receipt number. A QR code for the receipt opens the receipt; it is not a table ordering code.
Showing numbers on a screen of their own
A separate tablet or a TV with a connected browser device is suitable as the pickup monitor. The screen must reach the same DiKAS installation as the ordering kiosk.
- Open Admin → Settings → Operations → Self-order.
- Scroll to the section Abhol-Monitor (pickup monitor).
- Next to the address shown, click Adresse kopieren (copy address).
- Open this complete address on the display device. Sign in there if the sign-in appears. In hosted installations the POS path is, for example,
/admin/selforder/anzeige; the copied address is what counts. - If needed, switch the browser to full-screen mode and set the device so that the screen stays on during operation.
- At the top of the monitor open the gear. Choose how long finished numbers stay visible: 1, 2, 5, 10 or 15 minutes. The default is 5 minutes. The choice applies to this browser on this device.
- Place a test order and mark it as ready as described in the next section.
| Column | Meaning |
|---|---|
| Being prepared | The order is paid and is still being prepared |
| Ready | All required confirmations have been given; the order can be collected |
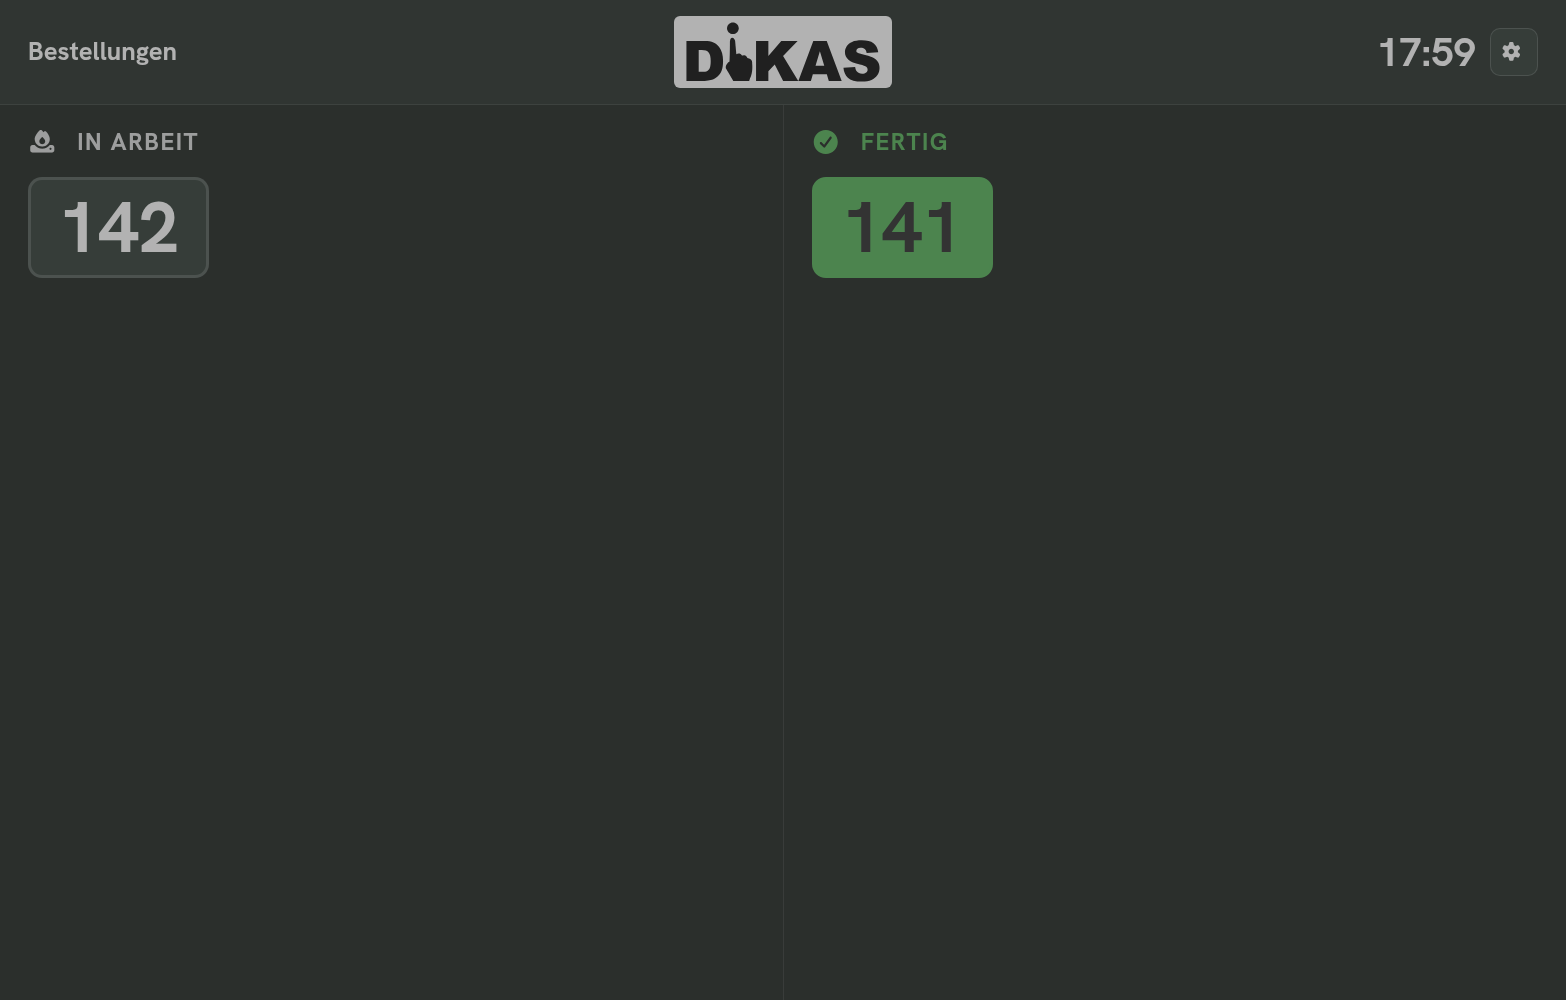
The display refreshes about every five seconds. Running numbers stay visible as long as the order is being prepared. Finished numbers disappear after the set time. Being hidden is no proof that the guest has already collected the order.
Pickup monitor and customer display have different tasks
The pickup monitor shows numbers for waiting guests. The customer display at the POS shows the cart, amount and receipt. For the number display use the address in the section Abhol-Monitor; pairing it as a customer display is not required.
Numbers on the guest's phone
The pickup numbers can also be reached without sign-in on a public page. On a guest domain it is, for example, https://YOUR-NAME.order.dikas.de/shop/abholung. Replace the example domain with the guest domain actually set up for your business; do not use the admin address of the monitor for this.
This page shows only numbers, no names, articles or receipts. It also refreshes every five seconds and shows finished numbers for five minutes. The time setting on the wall monitor does not change this duration. Check the link on a guest phone before you put it up as a link or QR code.
Custom logo and time on the pickup monitor
Your logo sits at the top centre; on the right guests see the current time. Without a custom logo the DiKAS logo appears.
- On the pickup monitor open the gear.
- Under Custom logo choose a file: PNG, JPEG or WebP, at most 5 MB.
- The logo is scaled down to fit and shown immediately. Close the settings via the gear.
- Remove logo switches back to the DiKAS logo.
The logo is kept after reloading. It applies to this browser on this display device; for another screen, select it there as well. If the browser data is deleted, the DiKAS logo is shown again. The clock takes the time and time zone of the display device. If the time is wrong, correct the device settings.
If the image cannot be loaded or saved, a message appears. Then check the file format, the size and whether browser storage is allowed.
Kitchen and counter: marking an order as ready
At the POS open Kitchen → Pickup. With Betrieb ohne Tische (operation without tables) this area is called Orders. There you find the kiosk's orders with their pickup number and the items for the kitchen and the bar. You can also process the orders in the combined view All.
- Find the order by its pickup number.
- The kitchen prepares the food and taps Food ready.
- If a confirmation at the counter is required, assemble food and drinks there completely and tap Order completed. As long as the kitchen is still open, this button stays locked.
- As soon as all required confirmations are in, the number on the guest monitor moves to Ready. Hand the order to the guest with this number.
| Content of the order | Setting "Küche meldet fertig" (kitchen reports ready) | Required action |
|---|---|---|
| Food only | On | Food ready is enough |
| Food only | Off | Food ready, then Order completed at the counter |
| Food and drinks | Both settings | Food ready, then Order completed at the counter |
| Drinks / bar articles only | Both settings | Order completed at the bar |
Whether an article belongs to the kitchen or the bar is determined by the section Küchenmonitor (kitchen monitor) in the print options of the article or its article group. This assignment is what counts, not the name of the article group.
Example: burger and cola, number 142
After payment 142 appears under Being prepared. The kitchen prepares the burger and confirms Food ready. 142 stays in progress. Only when the counter has added the cola and confirmed Order completed does 142 appear under Ready. This way the guest is only called when the whole order is ready.
The guest monitor is for display only. Tapping a number there does not mark an order as ready.
Check before the first guest
- QR table code scanned with a phone: correct table, correct articles and prices.
- QR test order arrived at the correct table; intended items visible in the kitchen.
- Ordering kiosk opened with its own address; card terminal and optional printer correctly assigned.
- Payment at the kiosk completed; pickup number received on the final screen.
- Same number found in Kitchen → Pickup and on the pickup monitor under Being prepared.
- Mixed order tested: still in progress after Food ready, under Ready after Order completed.
- Desired hiding time and screen operation checked; if used, the public phone link tested too.
If something does not work
| Observation | What to check? |
|---|---|
| Tab Self-order or QR table ordering is missing | Check the licence, the respective switch in the Operations module list and the Expert view mode; save the changes |
| QR code at the table is missing | Select the table and generate the code; if there is a note about a missing online name, have the guest address of your business set up |
| A printed table code no longer works | Was the code regenerated or renewed at end of day? Print the current code and replace old table stands |
| Kiosk does not show the right range | Check active articles, visibility and Erlaubte Artikelgruppen (allowed article groups); update the selection after changing article groups |
| A device opens the customer centre or the shop | Copy the complete address again from the matching kiosk row or from Abhol-Monitor |
| Payment at the kiosk is not possible | Check the assignment and reachability of this kiosk's card terminal |
| Payment succeeded, but the pickup number is missing | Ask the guest to come to the counter and check the sale using the receipt. Do not simply have them pay again |
| QR table order is missing from the number display | QR table orders are handled at the table; they do not get a kiosk pickup number |
| Number stays under Being prepared | Check under Kitchen → Pickup whether kitchen or counter still has to confirm; mixed orders need both steps |
| Order completed is locked | First confirm the open kitchen part with Food ready |
| Order is in the wrong work area | Check the section Küchenmonitor (kitchen monitor) in the print options of the article and its article group |
| Finished number disappears too early | Increase the hiding time via the monitor's gear; the public phone page stays at five minutes |
| Display reports a connection problem or does not refresh | Check the network and reachability of the DiKAS installation, then reload the page; sign in again if needed |