Payment Methods¶
DiKAS supports numerous payment methods — from cash payment to card payment, vouchers, customer credit, and house tabs. Multiple payment methods can be combined in a single transaction.
Overview of All Payment Methods¶
| Payment Method | Type Code | Cash Register Effect | Description |
|---|---|---|---|
| Cash | 0 | Yes (cash income) | Cash payment with change calculation |
| Debit card | 1 | Yes (card revenue) | Via ZVT terminal, Tap-to-Pay (SoftPOS or Softpay), Stripe or SumUp reader |
| Credit card | 1 | Yes (card revenue) | Via ZVT terminal, Tap-to-Pay (SoftPOS or Softpay), Stripe or SumUp reader |
| Net cash | 3 | Yes | Cash payment without VAT display |
| Net card | 4 | Yes | Card payment without VAT display |
| Bank transfer | 5 | No | Bank transfer |
| Customer credit | 10 | No | Prepaid credit from the customer |
| Voucher | 20 | No | Redeem value voucher |
| House tab | 99 | No | On customer account (credit) |
ℹ️ Note: Cash register effect means: The amount appears in the cash balance (cash) or in the card revenue (card). Payment methods without a cash register effect (house tab, credit, voucher) do not change the cash balance.
Who May Use Which Payment Method¶
Two staff permissions control the choice in the payment dialog — they are checked when payment is taken, not merely hidden:
| Till permission | Effect |
|---|---|
| Show admin payment types | Only with this box ticked can payment methods be used that are marked as an admin payment type in the settings (e.g. the "bank transfer" created by invoice printing). Without the box they are hidden — and rejected even if they are selected by another route |
| Deny opening invoice | Blocks every payment method with which the amount would remain as an open receivable: bank transfer/on invoice (type 5) as well as house tab, IOU, card credit and own consumption (type 99). Still allowed are customer credit (type 10 — the money is already on the account), voucher (type 20), online payment (type 11) and room account (type 12) |
If the permission is missing, the payment is aborted with "You lack the permission for this."; the receipt stays open unchanged and can be settled by an authorised person. Administrators and managers are exempt. → Staff Management
ℹ️ The type counts, not the name. Payment methods can be named freely — even if the house tab is called "Put it on the slate" and the bank transfer "On invoice", the block still applies. The only thing that matters is the Type column in the payment method list under Settings → Till → Payment types.
The block applies on all three routes to an open receivable: in direct sales, when settling a table and when using "Change payment method" afterwards in the till view Invoices. An already settled receipt therefore cannot be moved to "house tab" afterwards to get around the block. The opposite direction stays open: switching a house tab to cash or card afterwards is still possible — that is exactly what the staff member is supposed to do.
💡 If "bank transfer" suddenly disappears: The payment method that invoice printing creates itself is an admin payment type. It therefore only appears for staff with the box "Show admin payment types" ticked. If it is needed at the till day to day, give that permission to the staff member concerned — or settle the transaction using a payment method you have created yourself.
Cash Payment¶
- Tap "Pay"
- Select "Cash"
- Enter the amount received (or tap a quick-select button)
- DiKAS calculates the change automatically
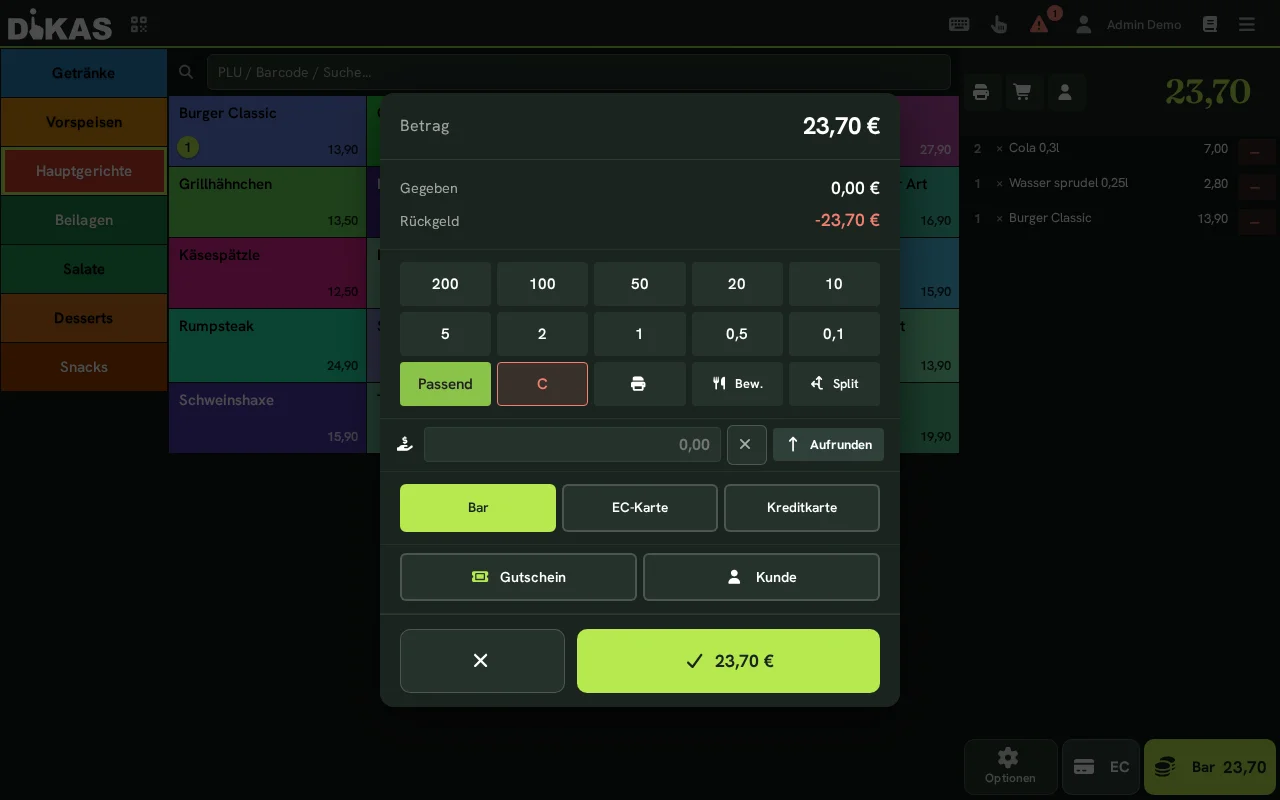
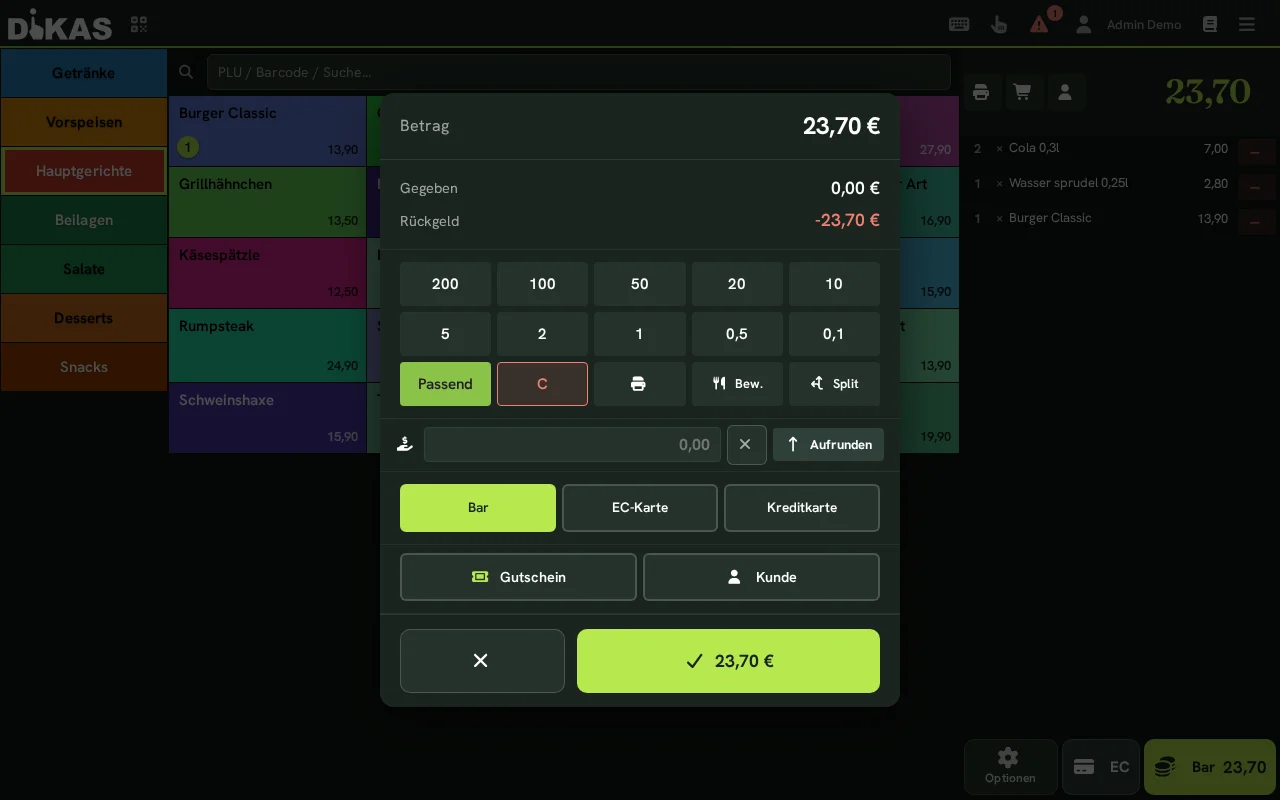
ℹ️ One name for cash payments: The "Cash" quick button of the direct sale books under the first active cash payment method in your payment method settings (factory setting: "Bar") — just like the payment dialog at the table. If your cash payment method is called, for example, "Cash payment", the register settlement, the end-of-day report and the Z-report still show cash in one line; older receipts booked as "Bar" are combined there. Whether a payment is cash is decided by the type of the payment method, not its name — also for the expected amount in the "Register Settlement" dialog and for the "Cash" and "Card" totals below the receipts in the cash book.
Quick-Select Buttons (Denominations)¶
In the payment dialog, fixed banknote/coin buttons let you quickly enter the amount given:
- Tap e.g. 20 to set "Given = 20.00 EUR" and calculate the change.
- "Exact" books the exact amount — no change needed.
- "C" resets the Given field.
💡 Leave the Given field empty and tap "Cash" directly — DiKAS automatically books "exact" (no change).
Change Calculation¶
| Total Amount | Given | Change |
|---|---|---|
| 12.70 EUR | 15.00 EUR | 2.30 EUR |
| 12.70 EUR | 20.00 EUR | 7.30 EUR |
| 12.70 EUR | 12.70 EUR (Exact) | 0.00 EUR |
ℹ️ Change is for display purposes only for the cashier. What is always recorded (and saved on the receipt/Z-report) is the invoice amount — not the given amount. If a guest declines the change, the difference is a tip (see below).
When the Cash Drawer Opens¶
The cash drawer has no connection of its own to the computer — it is attached to the receipt printer and is opened through it. It also opens when no receipt is being printed: cash has to go into the drawer, whether or not the guest wants a receipt.
Whether it opens on a payment is decided by four settings together. It is enough for one of them to say no — then the drawer stays shut:
| # | Setting | Where |
|---|---|---|
| 1 | "Kassenschublade aktivieren" (Enable cash drawer) — the global release for the whole business | Admin → Settings → POS → Payment Methods, below the list |
| 2 | "Schublade" (Drawer) per payment method: "Auto" (cash only), "Immer" (Always), "Nie" (Never) | Admin → Settings → POS → Payment Methods, column "Schublade" (Drawer) |
| 3 | "Kassenschublade nicht öffnen" (Do not open cash drawer) for an individual workstation | Admin → Settings → POS → Workstations |
| 4 | "Kassenlade nicht öffnen" (Do not open cash drawer) as an employee permission | Admin → Staff → [Employee] → Permissions |
When a cash receipt is voided, the drawer opens by the same rules — the payment method of the original receipt applies. This also works when no void receipt is printed.
The drawer stays shut even though the cash payment method is set to Auto?
Then the global release is usually switched off. It used to be invisible, and this exact combination has already cost businesses money: the payment method clearly showed Auto, while the global switch sat unnoticed in the off position. Check the four points in this order — from top to bottom.
What each level does
The global release enables the function for the business. The payment method determines when the drawer opens (cash yes, card usually no). The workstation excludes an individual register — a mobile register without a drawer of its own, for example. And the employee permission blocks individual people without changing the register as a whole.
If the drawer does not open despite correct settings, it is down to the wiring: the cable belongs in the kick-out port of the receipt printer, and the drawer has to match the printer's voltage — see Hardware → Cash Drawer.
💳 Card Payment (Debit / Credit Card)¶
DiKAS supports several terminal types — without third-party lock-in and without a DiKAS surcharge:
| Terminal Type | Description |
|---|---|
| ZVT terminal | Classic debit card terminal via network (ZVT standard, e.g. Ingenico, Verifone, CCV) |
| Tap-to-Pay (SoftPOS) | The Android device itself becomes the contactless card terminal — no extra hardware |
| Softpay | Tap-to-Pay via the Softpay app on the same Android device — also without extra hardware |
| Stripe Terminal | Stripe card reader, controlled via the Stripe cloud |
| SumUp Reader | SumUp Air/Solo, connected via the SumUp account |
Which terminal fits your business and how to connect it: Hardware → Card Terminals.
ℹ️ One name for card payments: The "Card" quick button of the direct sale books under the first active card payment method in your payment method settings (factory setting: "EC-Karte") — just like the payment dialog at the table. The end-of-day report, register settlement, Z-report and revenue report therefore show card payments in one line. Older receipts that were still booked as "EC" are combined there with this card payment method.
ℹ️ Card payments in the DSFinV-K export: A payment method of type "not cash" appears in the export for the tax office as EC card if Standard or Manual is set in the Terminal column or if it is your first card payment method — the name is freely selectable (e.g. "Card"). If the name contains a credit-card term (e.g. "Kredit", "Credit", "Visa", "Mastercard", "Amex", "Diners", "JCB", "Discover", "UnionPay"), it appears as credit card. A payment method of type "not cash" without a terminal, such as "Invoice", remains non-cash. The export recognises cash by the type Cash.
💡 Demo/Test without a real terminal: In demo mode DiKAS simulates the card terminal. The simulator deliberately rejects every second transaction ("Simulator: Payment declined") — so the error case can be tested too. Simply tap Pay again, the next transaction will succeed.
With ZVT Terminal (recommended)¶
- Tap "Pay"
- Select "Debit card" or "Credit card"
- DiKAS sends the amount automatically to the terminal (ZVT protocol)
- Guest holds card to the terminal or inserts it
- Terminal displays "Payment successful"
- DiKAS receives the confirmation and prints the receipt
Advantage: The amount is transmitted automatically — no manual entry at the terminal required.
With Tap-to-Pay (SoftPOS)¶
With Tap-to-Pay, the Android device running DiKAS becomes the card terminal itself — the guest simply holds their card, phone, or smartwatch to the device. No extra hardware is needed: no separate terminal, no cable, no pairing. DiKAS uses the certified SoftPOS technology of our partner RS2 for this.
One-time setup:
- Under Admin → Settings → Hardware → Payment options, tap "Terminal hinzufügen" (add terminal), select type "SoftPOS" and enter the RS2 terminal ID ("RS2-Terminal-ID"), the environment ("Produktion" = production; "QA (Test)" only for trying it out) and the merchant e-mail ("Händler-E-Mail").
- Use "Check status" to test readiness — once the icon turns green, everything is connected.
⚠️ Important: For security reasons (PCI certification), SoftPOS does not run while Android developer options are enabled. Turn these off before taking payments.
When charging:
- Select "Debit card" or "Credit card"
- DiKAS automatically opens the Tap-to-Pay payment screen with the amount
- Guest holds card / phone to the device
- After a successful payment, DiKAS automatically returns and prints the receipt
Advantage: No separate terminal, no cable, no pairing — the register device itself takes contactless payments.
With Tap-to-Pay via Softpay¶
With Softpay, too, the Android device running DiKAS becomes a contactless card terminal. The payment runs in the Softpay app on the same device: DiKAS hands over the amount, the guest holds their card, phone or smartwatch to the device, and the Softpay app reports the result back to DiKAS.
The labels on this settings screen are in German; their meaning is given in brackets.
Requirements:
- a merchant account with Softpay
- an NFC-capable Android device with the DiKAS app and the Softpay app
One-time setup:
- Under Admin → Settings → Hardware → Payment options, tap "Terminal hinzufügen" (add terminal), give it a name and select type "Softpay".
- Set the environment to "Produktion" (production; "Sandbox (Test)" only for trying it out) and save.
- In the "Softpay" section below, enter the merchant name ("Händler-Name") — the name under which Softpay lists your company, not the name of one of your locations.
- Open the Softpay app on the same device, sign in there with your merchant credentials and return to DiKAS. DiKAS does not store these credentials.
- On the terminal, tap "Store wählen" (choose store) and pick your store from the list. Softpay uses it to set up the terminal for this device — this can take a moment.
- Use "Bereitschaft prüfen" (check readiness) to test whether everything is connected.
No store, no payment
As long as no store has been chosen for the terminal, the device cannot take payments with Softpay.
When taking payment:
- Select "Debit card" or "Credit card"
- DiKAS opens the Softpay app with the amount
- Guest holds card / phone to the device
- After payment, the Softpay app returns to DiKAS automatically and the receipt is printed
Void and refund: A void works without the card being presented again as long as the settlement at Softpay is still open. If it has already been closed, DiKAS says so — then refund the amount via a credit; for this the guest holds their card to the device again.
No terminal closing needed: Softpay closes the settlement itself, so Softpay terminals have no terminal-closing button.
Changing devices: "Terminal freigeben" (release terminal) removes the assignment of this device. The sign-in in the Softpay app remains.
Without Terminal¶
- Select "Debit card"
- Enter amount manually on the external terminal
- After successful payment, confirm in DiKAS
Voiding a Card Payment¶
If the wrong amount was charged by mistake:
- Admin → Cash book or search for receipt
- Select "Void"
- Enter reason
- DiKAS sends a reversal request to the ZVT terminal
- The terminal voids the transaction
- A void receipt (with negative amounts) is created
Refund / Credit (Card)¶
Unlike a void (which refers to a specific booking), a credit is an independent refund to the card — e.g., for a return on a different day or a partial amount without the original receipt.
- At the POS: Menu → Card Credit (visible to staff with the "Card Credit" permission) — or in Admin → Settings → Payment Terminals tap "Card Credit" for the terminal
- Enter amount → "Process Credit"
- Guest holds card to the terminal
- DiKAS shows the result and customer receipt
Stripe & SumUp: credit only with the original payment
A free-standing credit to any card is only available on a ZVT terminal. Stripe and SumUp always refund against the original payment — so void the original receipt there instead, and the refund then runs automatically with that reference. This also protects against mistakes: an over-refund is ruled out this way.
Example — complaint the next day: A guest paid by card yesterday at "Bella Vista" and today complains about the bottle of wine they were charged for (24.00 EUR). The waiter opens Menu → Invoices, finds yesterday's receipt, and voids the item — or, with ZVT, alternatively goes straight to Menu → Card Credit for 24.00 EUR, and the guest holds their card to the terminal once more. The void receipt is automatically TSE-signed and documented in the cash book.
Card Type as Payment Method (optional)¶
On request, DiKAS can adopt the card type reported by the terminal (girocard, Visa, Mastercard …) as a separate payment method in reports — instead of just "Card". Switch under Admin → Settings → Payments.
Receipt & Terminal Printer¶
Per terminal, configure under Admin → Settings → Payment Terminals whether it has its own printer:
- With printer (default): The terminal prints the customer receipt and settlement itself. DiKAS does not additionally print the card receipt in the POS receipt — no double printing.
- Without printer: DiKAS prints the customer receipt in the POS receipt and the card settlement via the receipt printer.
Further Terminal Functions¶
Per terminal, the following are available under Admin → Settings → Payment Terminals:
- Status / Device Info — check connection, show terminal ID and merchant number
- Receipt Repeat — reprint the last receipt
- Turnover Subtotal — query the terminal's card total (also used at End-of-Day Report for reconciliation)
- Settlement — trigger the card terminal settlement
During a running card payment you can actively cancel at the terminal via "Cancel" in the payment dialog — the device then stops waiting for the card.
💡 Live messages from the terminal: If an action is triggered directly at the device (e.g., a void or settlement at the terminal itself), DiKAS shows it immediately at the POS via a persistent connection (setting "ZVT Device Listener").
ℹ️ Own ZVT integration: DiKAS includes its own ZVT integration — no third-party tool, no per-transaction surcharge. The terminal runs under your own contract at your bank conditions. In cloud mode DiKAS reaches the terminal via a local hardware agent in the venue network.
Redeeming a Voucher¶
Value Voucher (e.g., "Gift voucher 50 EUR")¶
- Select articles as usual
- Tap "Pay"
- In the field "Voucher no…" at the top of the payment dialog, enter the code or scan it via scanner → tap the magnifying glass
- DiKAS checks whether the code is valid, not closed, and has remaining balance
- The voucher amount is deducted from the invoice amount (up to the open total). Any remaining amount is settled with the chosen payment method (cash/card).
ℹ️ "Voucher" is not a separate payment method button to select — it is a deduction that is offset before the payment method selection. Multiple vouchers can be redeemed one after another.
ℹ️ Note: The value voucher is treated as a payment instrument for tax purposes. VAT is applied to the purchased articles — not to the voucher itself.
Single-purpose voucher (e.g., "Brunch for 2")¶
A single-purpose voucher is not processed as a payment instrument but as a negative receipt item (discount line). The VAT was already calculated when the voucher was sold.
→ Detailed instructions: Vouchers
Customer Credit¶
- Select customer (before paying!)
- "Pay" — if the customer has credit, DiKAS automatically deducts it from the invoice amount and shows the deduction at the top of the dialog
- If a remaining amount is left (credit insufficient), select a normal payment method (cash/card)
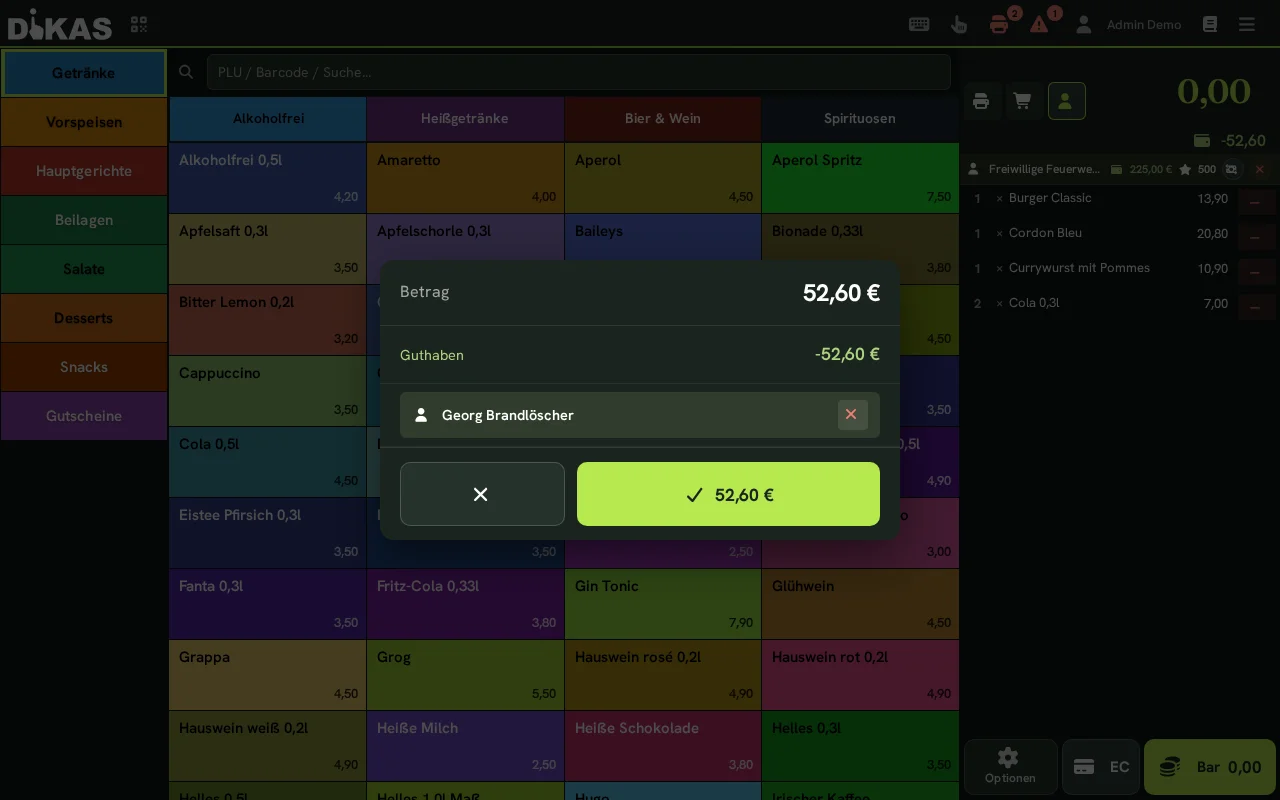
ℹ️ Customer credit is not a payment method button to select — it is always automatically offset as soon as a customer with credit is selected. Exception: if a top-up or payout article is in the cart, the automatic deduction is skipped.
If the credit is insufficient: The remaining amount is paid with another payment method.
→ Detailed instructions: Customer Credit
House Tab (On Account)¶
For business customers and regular customers who order on account:
- Select customer (recommended — otherwise the customer has to be assigned in the receipt screen via "Kunde zuordnen" (Assign customer) or created there before the invoice)
- "Pay" → select the payment method of type house tab
- The receipt is thereby closed and flagged as an open receivable — no cash flows
- You create the invoice for it in the receipt screen: Admin → Cashbook → tab "Rechnungen" (Invoices) → [Receipt] → "Rechnung (A4)" (Invoice (A4))
The name of the payment method is free
"House tab" is only the preset name. Many businesses call this payment method "Invoice", "On the slate" or "IOU". What matters is the type of the payment method (house tab or bank transfer), not its name — check under Admin → Settings → POS → Payment Methods which type your payment method has.
Important Details¶
| Property | Description |
|---|---|
| Cash register effect | None — no cash flows, and the amount does not count as a target amount in the daily closing |
| Invoice for it | Admin → Cashbook → "Rechnungen" (Invoices) → [Receipt] → "Rechnung (A4)" (Invoice (A4)) (also Admin → Customers → [Customer] → "Receipts") |
| Where visible? | With the Faktura module: Admin → Customers → [Customer] → Invoices. Without the Faktura module it stays with the receipt — the A4 printout is not stored. |
| Permission | Blocked for staff with the checkbox "Deny opening an invoice" — they cannot leave the receipt as an open claim |
Practical Example: Catering Company¶
"Event GmbH" regularly orders catering:
- Employee of Event GmbH orders: 20× Schnitzel, 20× Beverage
- Waiter selects customer "Event GmbH" → payment method "House tab"
- Later: Admin → Cashbook → tab "Rechnungen" (Invoices), click the receipt in the list, "Rechnung (A4)" (Invoice (A4))
- Print the invoice or hand it to the customer as a PDF
What DiKAS does not do here
A house tab is not posted to the customer account automatically, and there is no automatic consolidated invoice across several house tabs. Every invoice belongs to exactly one receipt. If you want to combine several receipts on one invoice, create the invoice by hand (only with the Faktura module: Admin → Customers → [Customer] → Invoices).
Net Payment Methods¶
For businesses with net customers (e.g., business customers receiving net invoices):
| Payment Method | Description |
|---|---|
| Net cash | Cash payment, receipt shows net amounts |
| Net card | Card payment, receipt shows net amounts |
Net payment methods must be enabled in the settings.
🔀 Combining Multiple Payment Methods (Split Payment)¶
A guest can pay with any number of payment methods simultaneously:
Example 1: Cash + Card¶
Total amount:        45.00 EUR
─────────────────────────────
1. Cash:             20.00 EUR
2. Debit card:       25.00 EUR
─────────────────────────────
Paid:                45.00 EUR
Example 2: Voucher + Credit + Cash¶
Total amount:              60.00 EUR
───────────────────────────────────
1. Voucher GS-A7B3:        30.00 EUR
2. Customer credit:         20.00 EUR
3. Cash:                    10.00 EUR
───────────────────────────────────
Paid:                       60.00 EUR
Example 3: Customer Credit Insufficient¶
Total amount:              25.00 EUR
───────────────────────────────────
1. Customer credit:         18.50 EUR  (entire balance)
   Remaining amount:         6.50 EUR
2. Cash:                     6.50 EUR
───────────────────────────────────
Paid:                       25.00 EUR
Split Payment Workflow¶
- Tap "Pay"
- Tap "Split"
- Enter the amount for the first payment method (e.g., 20.00 EUR card)
- The second payment method automatically takes the remaining amount (e.g., 25.00 EUR cash)
- Both payment methods freely selectable; confirm
ℹ️ The split function divides a payment across exactly two payment methods. Vouchers and customer credit are additionally offset automatically beforehand — allowing combinations like "Voucher + Credit + remaining by cash" in practice.
Each payment method used is stored as a separate payment record — for seamless bookkeeping.
What Happens During Payment in the Background?¶
Every payment in DiKAS goes through the following steps:
| Step | Description |
|---|---|
| 1. Check permissions | Does the employee have checkout permissions? |
| 2. Load articles | All ordered articles and their tax classes |
| 3. Create receipt | Receipt with items, taxes, payments |
| 4. TSE signing | Signature for the tax authority (KassenSichV) |
| 5. Book payments | Payment records per payment method |
| 6. Process vouchers | Create new vouchers / redeem existing ones |
| 7. Update customer account | Credit, points, last visit date |
| 8. Print receipt | Receipt on the configured printer |
| 9. Release table | Set status to "Free" or "Cleaning" |
Hospitality Receipt (Bewirtungsbeleg)¶
For business entertainment (tax-deductible under § 4 para. 5 German Income Tax Act), DiKAS creates a separate hospitality receipt with all required details:
- Order/ring up articles
- In the payment dialog tap the "Hosp." button (before selecting the payment method)
- With "Hosp." active, an additional "Tip" field appears (in EUR). Optionally enter the tip amount to be shown on the hospitality receipt.
- Complete payment
- The hospitality receipt is additionally printed/generated as PDF — the entered tip appears as a separate line on the receipt
Other Payment Methods & Devices¶
In addition to cash and card, DiKAS supports further — sometimes less obvious — payment options:
| Payment Method / Device | Description |
|---|---|
| Admin payment methods | Payment methods visible only to staff with the "Admin payment methods visible" permission (e.g., internal billing) |
| Cash machine | Connected coin/bill changers (Settings → Hardware → Cash Aut.): the payment amount is sent to the machine, change is dispensed automatically |
| OnlinePayment (11) | Online prepaid orders (e.g., delivery service prepayment, Stripe/PayPal) |
| Tap-to-Pay | Android smartphone as contactless card terminal (no separate device) |
Tips¶
Tips can be recorded in three ways:
- Tip article: Special article with tip flag → Amount is shown separately
- Extra cash given: When the guest gives more cash than needed and declines the change
- Entered at the terminal: If the guest enters the tip at the card terminal, the charged amount is higher than requested. DiKAS recognizes the difference and posts it as a tip — not a correction. Works in direct sale and at table payment.
Tips appear in the end-of-day report as a separate item and are assigned to the respective waiter.
Next Step¶
→ Vouchers — Selling and redeeming vouchers → Customer Credit — Prepaid accounts for regular customers