Kitchen Printer & Kitchen Display
Orders are automatically forwarded to the kitchen — either as a printed ticket or on a screen (Kitchen Display System). This way, the kitchen instantly sees what needs to be prepared without the waiter having to come in person.
Kitchen Printer
Setup
- Admin → Settings → Printers
- Create a new printer:
| Field | Description | Example |
|---|---|---|
| Name | Printer designation | Kitchen printer |
| IP address | Network address | 192.168.1.51 |
| Port | ESC/POS standard | 9100 |
- Admin → Articles → [Article group]
- For the group "Dishes", assign the kitchen printer as the receipt printer
Now all food orders are automatically printed on the kitchen printer.
What Is Printed?
A kitchen ticket contains the table number, course, items with options, and the waiter's name:
══════════════════════════════
  KITCHEN            Table 5
──────────────────────────────
  Course 1

  2× Schnitzel
     → without fries
     → with rice
  1× Lasagna

  Waiter: Maria    18:45
══════════════════════════════
Multiple Printers for Different Areas
You can set up different printers for different areas:
| Printer | Article Groups | Location |
|---|---|---|
| Kitchen printer | Dishes, sides | Kitchen |
| Counter printer | Beverages, cocktails | Counter/Bar |
| Dessert printer | Desserts, ice cream | Patisserie |
Each article group can be assigned to its own printer — or to multiple printers at once (e.g. kitchen + consolidated order ticket).
Print Assignment at Article Level
The print assignment follows a hierarchy:
- Article's own print setting (highest priority)
- Article group of the article
- Parent article group (parent group)
Additionally, ExtraPrintOptions can be configured per table group — e.g. "Terrace orders on printer 2".
🖥️ Kitchen Display (KDS)
The kitchen display (Kitchen Display System) shows orders on a screen — no paper, no clutter. New orders appear in real time via SignalR websocket.
Setup
- For the articles/article groups that should appear in the kitchen, enable Kitchen display in the print options (see "Configuration at Article Level" below)
- Open a browser on the kitchen screen
- Navigate to:
http://[Server-IP]:5015 - Log in and select Menu → Kitchen
ℹ️ There is no separate "Enable kitchen display" toggle in the settings. The display is always reachable and shows every item whose article (or article group) is enabled for the kitchen display.
Order Display
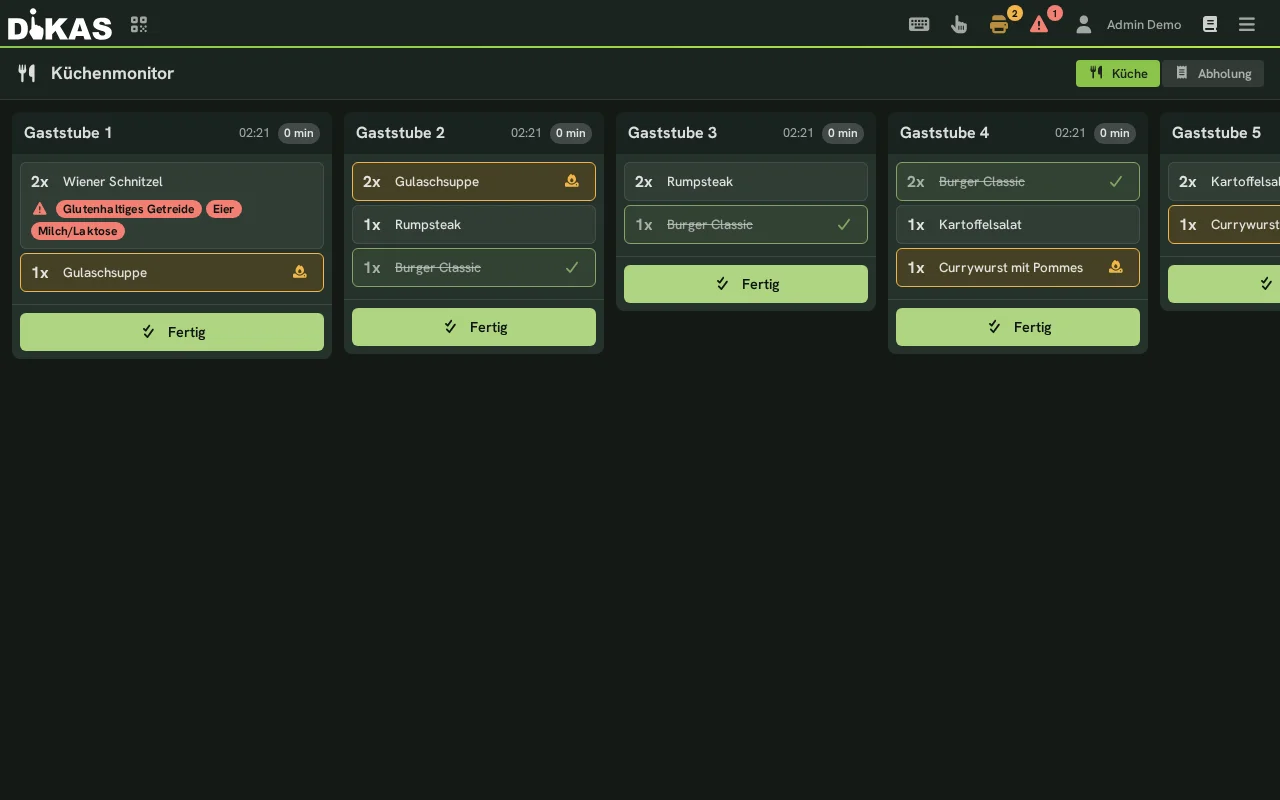
Orders are displayed as cards per table, sorted by arrival time (oldest first):
┌───────────────┐  ┌───────────────┐  ┌───────────────┐
│ Table 5       │  │ Table 2       │  │ Table 8       │
│ 18:45 (3 min.)│  │ 18:42 (6 min.)│  │ 18:31 (17 min)│
│───────────────│  │───────────────│  │───────────────│
│ Course 1      │  │ Course 1      │  │ Course 2      │
│ 2× Schnitzel  │  │ 1× Pizza      │  │ 3× Burger     │
│   → without   │  │ 1× Salad      │  │   → medium    │
│     fries     │  │               │  │ 1× Steak      │
│ 1× Lasagna    │  │               │  │   → rare      │
│               │  │               │  │               │
│  [🔥 Cooking] │  │  [🔥 Cooking] │  │  [✅ Done]    │
└───────────────┘  └───────────────┘  └───────────────┘
        white            orange              red
Color Coding (Wait Time)
The cards change color based on wait time — so the kitchen can see at a glance which orders are urgent:
| Wait Time | Color | Meaning |
|---|---|---|
| 0–5 minutes | White | New order, everything on schedule |
| 5–15 minutes | Orange | Order is waiting — attention needed |
| Over 15 minutes | Red | Critical — order overdue |
The wait time is calculated from the time of the oldest item on the table.
Work Status (WorkStatus)
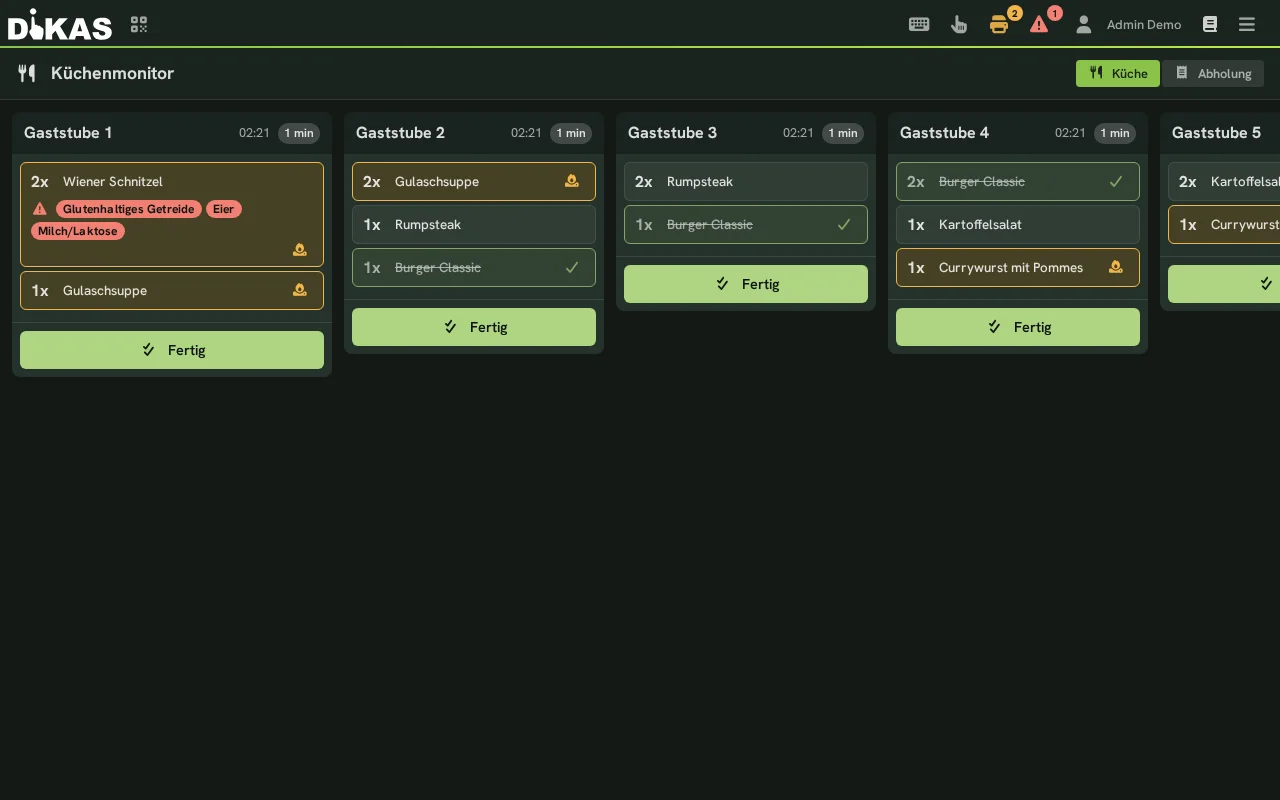
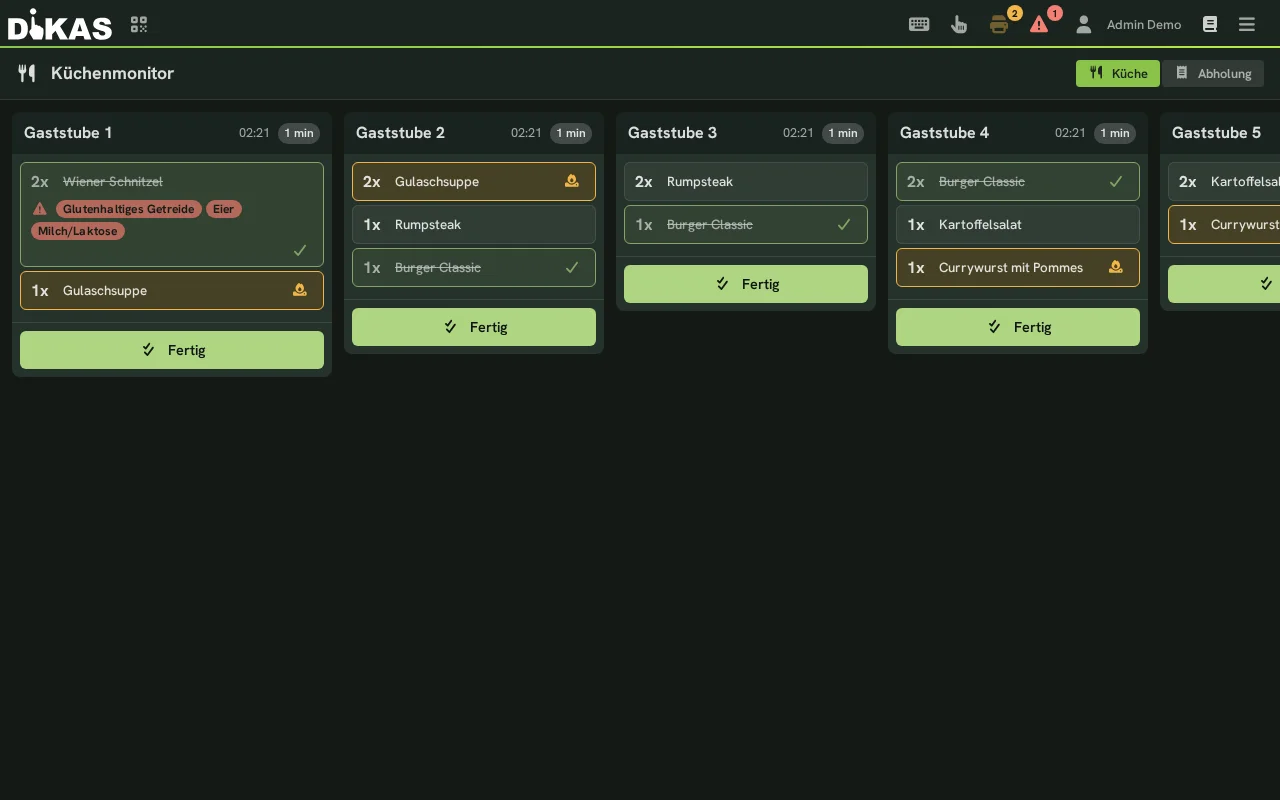
Each individual item can be cycled through its status by tapping it. In practice, you'll use this cycle:
  New    →    Cooking started   →   Cooking done   →   (back to New)
 ┌────┐      ┌────┐                ┌────┐
 │ 📋 │  →   │ 🔥 │       →        │ ✅ │
 └────┘      └────┘                └────┘
| Status | Description | Display |
|---|---|---|
| New | Item received, not yet started | Default |
| Cooking started | Preparation in progress | Orange border + flame icon |
| Cooking done | Preparation complete | Green border + checkmark (strikethrough) |
Tapping a "done" item again switches it back to "New". The "Done" button on the whole table card completes all items at once and the card disappears from the monitor (see below).
ℹ️ Internally, the system also has the stages "Packed" and "Completed" — but in the current display these aren't reachable by tapping.
"Done" Button
When all items for a table have been prepared:
- Tap "Done" on the table card
- All items are set to status "Completed" (99)
- The card disappears immediately from the monitor (optimistic update)
- The waiter sees in the POS that the order is ready
The status change is transmitted to all connected devices in real time — including other kitchen displays and the POS.
Course Control on the Monitor
Orders are grouped by course within each table card:
┌──────────────────┐
│ Table 5          │
│ 18:45            │
│──────────────────│
│ Course 1         │
│ 1× Tomato soup   │
│ 1× Bruschetta    │
│                  │
│ Course 2         │
│ 1× Beef fillet   │
│ 1× Salmon fillet │
│                  │
│ [Done]           │
└──────────────────┘
When the waiter triggers a course change at the table, the new course is updated on all open items for that table and displayed grouped accordingly in the kitchen display.
On top of that, a course ticket is printed on the assigned (station) printers whenever the course changes, so the kitchen is informed of the new course immediately, even without the monitor.
🍽️ Course release (set-menu service)
By default the kitchen sees every booked item immediately as a work order. With a multi-course menu that is wrong: the starter should go on the stove now, the dessert only in an hour. That is what the course release is for.
Switching it on: Admin → Settings → Till → Front end → "Gang-Freigabe" (course release; the option is labelled in German in every language). Off means: everything behaves as before, without course control.
How it works:
- Every item belongs to the course that is running at the table when it is booked.
- The kitchen display shows later courses as "announced" — set off visually, but never hidden. The kitchen always sees what is coming and can plan ahead.
- A course is released as soon as the service staff set the table to that course: tap and hold the table → "Release course" → choose the course. The table then runs on that course; all courses up to it count as released.
The "Done" button needs a released course
If a table card contains only announced courses, "Done" is locked and reports: "No course released on this table yet". That is not an error — the release by the service staff is simply missing.
Items without a course are not affected
Drinks and everything booked without a course always count as released. And as long as a table is not yet on any course, the display shows everything as usual — so the course release never slows down normal à-la-carte service.
Display Size
Kitchen displays are rarely within arm's reach: sometimes they hang high above the pass, sometimes it is a small panel at the cold station. The display can therefore be enlarged or reduced directly on the monitor itself.
In the header bar of the kitchen display there are two buttons for this, with the current size shown between them:
| Button | Effect |
|---|---|
| "Decrease display size" (−) | one step smaller — more orders fit side by side |
| "Increase display size" (+) | one step larger — still legible from several meters away |
The steps are 80, 100, 125, 150 and 200%; 100% is the previous size and remains the default. Text and tile width grow together — so the text does not run out of a tile that has stayed the same width.
The setting applies to this screen only
The size you choose is stored on the device on which you set it and is kept there even after a restart. A second kitchen display, the tablet at the pass and the register each keep their own setting. There is deliberately no central specification: what is legible from three meters away is decided by the place where the screen hangs.
Set it on site, not on the office PC
Set the size on the screen in question and look at it from the place where the work will later be done. Whether 125% is enough from three meters away can only be seen there.
The tabs of the kitchen display
Depending on the modules switched on, the display shows up to four tabs at the top:
| Tab | Content | Visible when |
|---|---|---|
| All | Kitchen, pickup and delivery in one row, oldest order on the left | always |
| Kitchen | Table orders, grouped by table and course | always |
| Pickup | Orders from the self-order kiosk, split into "eat in" and "take away" | self-order active |
| Orders | Re-ordering directly from the kitchen | depending on setup |
| Delivery | Delivery and online orders with status flow | delivery service active |
"All" saves switching
In the All tab, tables, pickups and deliveries stand side by side — sorted by age, oldest order on the left. The kitchen thus works by "what came in first" instead of by channel and no longer has to switch between tabs so as not to miss anything.
The last selected tab is remembered — per screen. A display you once set to "All" opens there from then on; the till next to it keeps its own choice.
Scrolling when there are more orders than space
If not all cards fit side by side, scroll with the large arrow buttons on the left and right edge of the screen. One press shows the next set of cards — not just one card further. A scroll bar at the bottom also shows how much is still to come.
The arrows only appear when there is something to see
At the start of the row the left arrow is missing, at the end the right one. If you see no arrow, all open orders are already on the screen.
One display per station (salad, pizza, …)
Larger kitchens run several screens — one at the salad station, one at the oven. So that each screen shows only what concerns it, choose Stations in the header bar:
- Tap the Stations button in the header bar
- Tick the article groups this screen should show (e.g. "Salads")
- Apply
The button then shows a number — it indicates that a filter is active and how many article groups are selected.
| Choice | What the screen shows |
|---|---|
| nothing selected | everything (default) |
| one or more article groups | only items from these groups |
A filtered screen has no "Done" for the whole table
The salad display only sees the salads of table 7. If it could mark the whole table as done, the pizza would disappear from the pizza display without anyone having made it. Therefore: only a screen that sees the whole table may mark it done. The individual items remain operable on every screen.
Articles without an article group stay visible everywhere
If an article has no article group, it appears on every screen. That is intentional: otherwise an article that was not maintained would appear at no station — and the guest waits for something nobody sees.
The setting applies per screen
Like the display size, the station choice is stored on the device on which you make it. So set it directly on the respective kitchen display.
Delivery Service Tab
If the delivery service is enabled (Admin → Settings → Operations → Delivery service), a second tab "Delivery service" appears in the kitchen display.
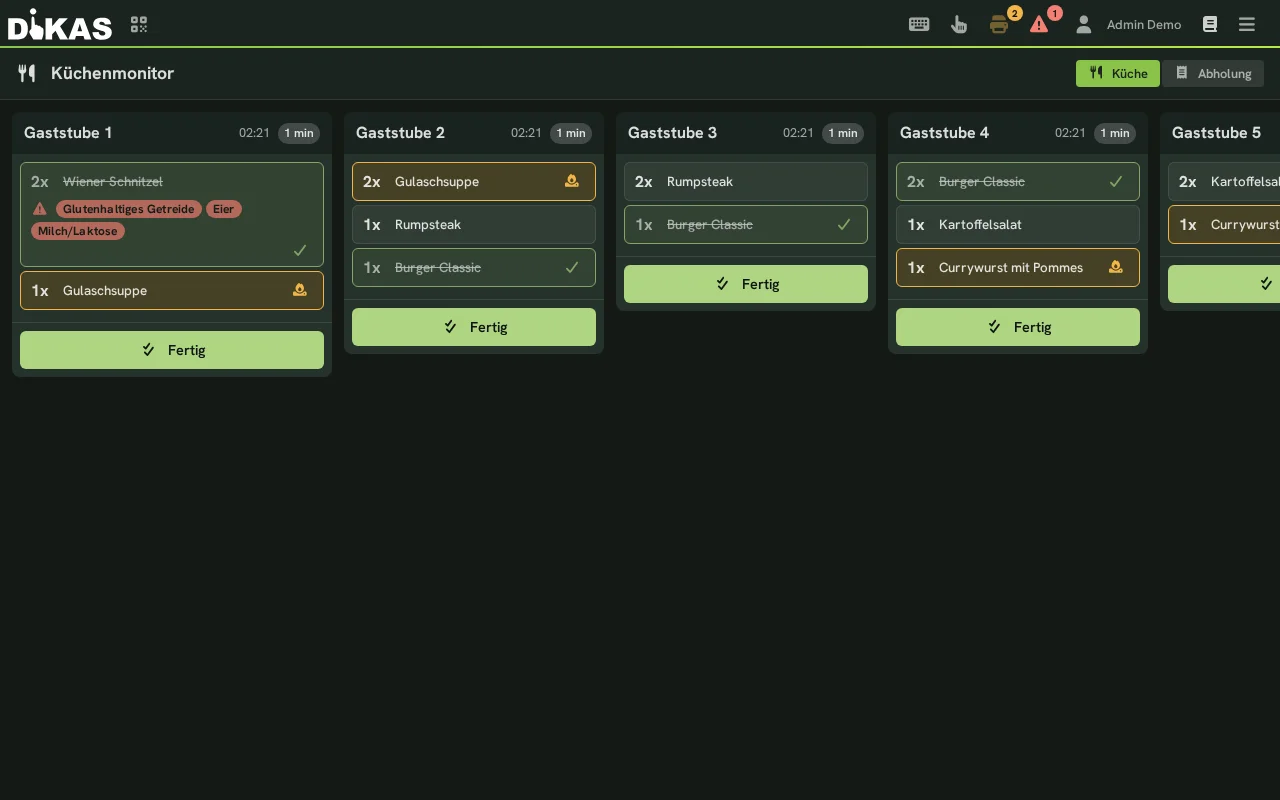
Delivery Service Orders in the Kitchen
| Column | Description |
|---|---|
| Order number | e.g. "#1042" |
| Customer name | Name of the person who placed the order |
| Desired delivery time | If specified |
| Items | Articles with quantity and notes |
Delivery Service Status
Delivery service orders have their own status workflow:
| Status | Value | Description |
|---|---|---|
| Pending | 0 | Order received |
| Confirmed | 1 | Order accepted |
| In preparation | 2 | Being prepared in the kitchen → visible in kitchen display |
| Ready | 3 | Preparation complete, waiting for pickup/driver |
| On the way | 4 | Driver is en route |
| Delivered | 5 | Delivered |
| Cancelled | 6 | Order cancelled |
Only orders with status "In preparation" (2) are shown in the kitchen display. The "Ready" button sets the order to status 3 and it disappears from the kitchen view.
Real time without reloading
When the waiter books, the card appears immediately on every connected kitchen display — also on several at the same time (kitchen and bar). A status change or void is distributed in the same way; nobody has to reload the page. How this works technically is described under REST API → Real-time.
Configuration at Article Level
Which articles appear in the kitchen display is controlled via the print options:
Admin → Articles → [Article/Group] → Print options → Kitchen display
| Setting | Description |
|---|---|
| Enabled | Article appears in the kitchen display |
| Target workstation | Optional: assign the article to a specific monitor/workstation — the filter is applied (see below) |
| Extra ticket after done | Ticket is printed when an item is completed (this now actually prints) |
| Extra ticket printer | Which printer to use for the extra ticket |
The kitchen display setting is inherited hierarchically: if the article group "Dishes" is enabled for the kitchen display, all articles in that group appear automatically.
ℹ️ Note on target workstation: The kitchen display filters by the selected workstation and shows only the items assigned to it. This lets you achieve a true "food only / drinks only" separation per monitor via the workstation filter.
Advantages Over Printer-Only Operation
| Property | Printer | Kitchen Display |
|---|---|---|
| Paper consumption | High | None |
| Overview | Paper clutter | All orders at a glance |
| Real time | Ticket must be read | Instant display + update |
| Sequence | Tickets can get mixed up | Automatically sorted by wait time |
| Status tracking | Not possible | Status per item (New/Cooking/Done) |
| Urgency | Not visible | Color coding by wait time |
| Feedback | None | "Done" → waiter is notified |
| Void | New ticket needed | Automatically updated |
💡 Tip: Even if you use the kitchen display, you can additionally configure a kitchen printer as a backup — e.g. in case the monitor fails.
📟 Pager
If you sell at the counter and send the guest away with a pager, you need that device's number on the kitchen card and on the receipt. DiKAS answers two separate questions in two places:
| Question | Where it is set |
|---|---|
| Whether this sale gets a number | Article → “General” tab (only in the Expert view mode) → switch “Ask for pager ID on payment” |
| Where the number comes from | Administration → Settings → Operation → Pager |
The two are deliberately separate: the same article data then works both in a venue with pagers and in one without. If no marked article is on the ticket, nothing happens at all.
The two modes
Manual (default) — when taking payment the till opens a dialog with a number pad and asks for the number of the device the guest is given. It asks once per sale, on every payment route of the direct sale (quick cash, quick card, payment dialog). If the dialog is cancelled, the till says so explicitly and does not take payment.
Why a number pad
A till is a touch panel and often has no keyboard at all. The pad can be operated with a thumb. Keyboard and handheld scanners still work: digits and letters are typed in, Enter confirms, Esc cancels.
Automatic — the till asks nothing; the server assigns the next number of the business day: 100 to 999, then back to 100. This is a separate number range alongside the pickup numbers of self-service, so both can run in the same venue without two guests hearing the same number. Numbers are assigned centrally so two tills in the same house never hand out the same one.
At the disco counter
At the counter of the disco module, items are booked to the guest card, not paid. The number is therefore created when booking (once per "Book", manually via the same number pad or by the server in Automatic mode) and belongs to the booking, not to the card. → Disco counter
At the table
Asking and automatic assignment apply to direct sales (and therefore also to kiosk and pickup sales). When a table is paid in the table view, the till does not ask for a number, and in Automatic mode the table does not get one either — at a table the guest is seated, and a pager is the exception there.
Where the number appears
- Customer receipt — as its own line.
- Kitchen display — large and highlighted at the very top of the card. When marking an order done, that is the detail that counts.
- Kitchen → Pickup — the same line at the top of the pickup card. (The pickup monitor for guests only shows the pickup number, not the pager number.)
- Extra ticket and consolidated order ticket — as the line “Pager:” directly below the destination, and likewise on the slip printed after a position is marked done. That is the slip that goes on the plate: in a direct sale it would otherwise show only “Direct sale” and thus no destination at all.
Without a pager the line stays away instead of taking up space empty.
There is no “pager printer”
The pager is information about the transaction, not a print route — anyone looking for it in the print settings of an article or product group is looking in vain.
🔁 Later orders as their own card
If a table orders dessert half an hour after the main course, the old card otherwise keeps growing — carrying the age of the first item and a “Done” that clears everything at once. The setting “Split table orders after (minutes)” (Administration → Settings → Operation) prevents that.
| Value | Behaviour |
|---|---|
| 0 | Off. A table stays one card with everything on it. |
| e.g. 5 | Every booking that arrives more than 5 minutes after the current wave started begins its own card — with its own age, its own colour and its own “Done”. |
Timing is measured from the first booking of a wave, not rolling. A server who takes the order item by item therefore still produces one wave; the main courses half an hour later produce a second. Without this fixed measurement the split would never end at a busy table.
🛒 Direct sales on the kitchen display
A sale made at the direct till (without a table) also appears on the kitchen display as soon as one of the sold positions is set up for kitchen display — exactly like a table order. The cards are grouped by order, not by table: every checkout is its own card, just as it is handed out at the counter. If a pager has been assigned, its number is shown large at the top.
An article is out ("Out")
If the salmon trout has run out, the kitchen locks the article directly on the display — without going via the administration:
- Tap "Out" in the header bar
- Under "Currently on screen" all articles that are running on a card at the moment (from all areas together) appear as large tap areas. Tapping only marks them at first — tick and coloured frame
- Tap "Lock N selected" — only now are the marked articles locked. Without a mark the button is grey
- If the article is not on the screen at the moment, find it via the search below; there one tap locks the article immediately
A locked article shows the badge "Aus" (out) at the till, can no longer be booked there and at the same time disappears from QR ordering, kiosk and web shop. Releasing it again: in the same window under "Currently out" tap "Back in stock" next to the article.
Mark first, then lock — on purpose
The list "Currently on screen" shows exactly what is being cooked at this moment. If a single tap locked immediately, a slip in the heat of the kitchen would switch off a running dish at the till, the kiosk and in the web shop. Hence the second step.
Practical Example: Restaurant with Kitchen and Bar
Situation: Restaurant "Bella Vista" with a separate kitchen and bar.
Setup: - Monitor 1 in the kitchen: shows only food groups - Monitor 2 at the bar: shows only beverage groups (filtered via target workstation) - Backup printer in the kitchen for outages
Workflow: 1. Waiter Maria places an order at Table 5: 2× Schnitzel + 2× wheat beer 2. Schnitzel appears instantly on Monitor 1 (kitchen) 3. Wheat beer appears on Monitor 2 (bar) 4. Bartender pours the wheat beer → taps "Done" → card disappears 5. Cook prepares the Schnitzel → taps "Done" → card disappears 6. Maria sees in the POS: Table 5 is ready to be served
Frequently Asked Questions
Does the kitchen display work on a tablet? Yes. The kitchen display is a web application and works on any device with a browser — tablet, PC, TV screen.
What happens with a void? Voided items automatically disappear from the kitchen display. If the cook has already prepared the item, they see the change immediately.
Can I run multiple kitchen displays simultaneously? Yes. All monitors are synchronized via SignalR. The target workstation setting lets you define per monitor which items are displayed (e.g. food on Monitor 1, drinks on Monitor 2).
Do I need internet for the kitchen display? No. The kitchen display runs entirely on the local network. The devices only need to be able to reach the DiKAS server.
Online and QR Orders on the Kitchen Display
When DiKAS is used with a cloud connection, online orders, delivery and pickup orders, and QR table instant orders appear automatically and instantly on the kitchen display — just like orders placed by a waiter at the table.
The kitchen display does not distinguish between the source: whether a waiter places an order at the table or a guest orders via the web shop — the ticket appears immediately on the display.
- Online orders / delivery service: appear in the "Delivery service" tab (see above)
- QR table instant orders: appear directly in the regular table view
How it works
The cloud forwards incoming orders immediately to the local machine (relay). The local machine then updates the kitchen display in real time — no manual refresh needed. → More details: Cloud & Local Machine
Next Step
→ End-of-Day Report — Close the shift and cash count